


Circular 209
We are a research and service division of:
NMBGMR | PRRC | GO-TECH
Overview | ArcView Project | ArcExplorer Project | Pooltools | PDFs | Morrow Play
This is the documentation for Circular 209
which is available on CDROM
which is available on CDROM
The Pooltools extension
For Editing Poolmaps
Software by: Adam Read
Note: unless you want to make permanent changes to the poolmaps, you shouldn't load this ArcView extension!
The pooltools extension adds several new poolmaps editing tools to ArcView. You can access these tools by placing the file pooltools.avx (in the /Programs/PoolTools_Ext folder) into the Ext32 directory (usually located at C:\esri\av_gis30\arcview\ext32). A self extracting zip file will also do this for you (click on 'pooltools.exe' and navigate to the correct directory--if different from the default). Open to the Extensions manager in ArcView (from the project window click File>Extensions) and check 'Pooltools' from the drop down menu. You can unload the extension by unchecking 'Pooltools' in the Extensions manager.
Putting a Pool Theme in edit Mode
- Make the theme you want to edit visible and active and then click the 'Pool editing on/off'
 button to start editing the pool. Note that this button will only be active if a pool theme is both visible and active.
 - Once in edit mode, changes to the theme are not final until the user takes the theme out of edit mode and answers 'Yes' when asked to save changes. If you wish to undo an editing operation while in edit mode, use the 'Undo' option under the 'Edit' menu. You can undo multiple edits in sequence this way or undo all of them by answering 'No' at the "save edits" prompt when you stop editing a theme.
If you wish to delete pools or portions of pools, use the 'delete pools' ![]() tool
tool
- The 'delete pools' tool will only be active if a theme is in edit mode.
- Click on the tool and then either click on an individual section or draw a box around several sections that make up a pool that you want to delete.
- The current data for an individual pool will be shown or the number of features to be deleted will be indicated in a confirm delete message box.
Adding New Pools as Full Sections
- To make a whole section a new pool, first put the theme in edit mode (see above).
- Navigate to the section or region you wish to add pool(s) to and use the 'Make pools'
 tool to add the pools. You can either click on a single section or draw a box around several sections to make a larger pool. Note that this tool will only be active if a pool is in edit mode, and is both visible and active. Also if any overlap between new and existing pools will occur, the user is prompted to respond if that is OK.
 - The user is then asked if this new pool will have be part of an existing pool that pool data can be copied from or if the data should be entered by hand.
- If you choose to copy data from another pool, the new pool will be selected once it is added and will be in bright colors. Use the 'copy attributes' tool (see below).
- Follow the prompts if you choose to enter the data by hand.
If you wish to add a new pool to a section but want to split it into a smaller pool (e.g. ¼ section) then follow the directions for adding an entire section before using the split tool.
- Use the 'split pools'
 tool to split pool polygons
 - To begin splitting a polygon Move cursor + just outside of the polygon to be split then single click to begin drawing the line. Single click at Each Vertex and end the split by Moving the cursor + just outside of the polygon and "double clicking". See figure below.
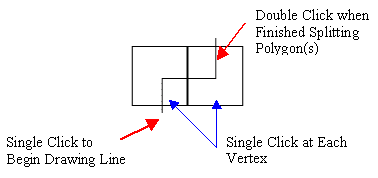
-
After double clicking to end the splitting process. The pool will be split into multiple features that will all be selected.
- There are several snapping functions that may be very useful when splitting pools:
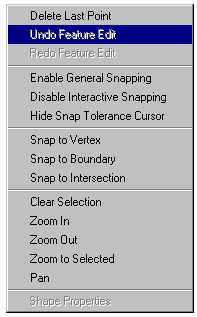
- Right click and hold anywhere in the view when in edit mode to bring up a popup menu. Move the mouse over the 'Enable Interactive Snapping' popup and release the right mouse button. Click on the 'interactive snap tool'
 and then click on the view and drag in order to set the size of the snap tolerance (how close you need to be to a boundary, vertex, or intersection before the snap will work).
 - When you are using the split tool (or drawing tools) while editing a view, click and hold the right mouse button to bring up the choices for interactive snapping. Select the type of snapping function you want and continue splitting the pool.
- Part of your pool may have to be either deleted or have the attributes updated. See the copy attributes discussion above or use the delete tool (see below).
If you wish to add to a pool to a section that already has a partial section pool, It is often easiest to just delete the partial section pool and just start over. However, if you wish to copy the data from the partial section pool because it is the only existing feature in the pool then try this approach
- Select the pool with the 'pointer tool'
 and move it out of the way temporarily.
 - Use the 'make pools' tool to remake the pool. When asked if you want to copy data instead of enter it, say yes.
- Use the 'copy attributes'
 tool to copy the data to the new pool
 - Delete the pool you moved out of the way using the 'delete pools'
 tool.
tool.
Copying Pool Data From one Pool to Another
- In order for the 'copy attributes' tool to be active, the pool must be in edit mode and features must be selected (use the 'pointer'
 tool).
Note: If you just make a new pool (as above) and want to copy the attributes from an adjacent section, the pool will already be selected. - Click on the 'copy attributes' tool and then click on the pool you wish to copy data from.
- The pool info will be displayed and you will be asked to confirm the copy operation.
Modifying Pool Data
If you want to change the name, type, or formation name assigned to a pool use either the 'copy attributes' ![]() tool as discussed above or the edit pool info
tool as discussed above or the edit pool info ![]() tool
tool
- The 'edit pool info' tool will only be active if a theme is in edit mode.
- Click on the tool and then either click on an individual section or draw a box around several sections that make up a pool that you want to change data in.
- The current data for that pool will be set as the default. Press Yes if you want to keep the same data
- Type in changed data where appropriate.
- Note: this tool will also allow you to modify features are already selected.
Moving Pools from one Theme to Another
If you want to move a pool from one theme to another theme, use the 'move pools' ![]() tool:
tool:
- The 'move pools' tool will only be active if a pool theme visible and the target theme is active and in edit mode.
- If the source theme already has selected features, then the program will ask if those features should be moved.
- Click on the 'move pools' button and the pool will be moved. If there will be overlap between pools the user will be asked if that is OK.
There are three tools for annotating pool maps: the 'label pools' ![]() tool, the 'make label leaders'
tool, the 'make label leaders' ![]() tool, and the 'draw pool boundaries'
tool, and the 'draw pool boundaries' ![]() tool. Each of these tools requires that a pool theme be visible and active (but not in edit mode) to be active.
tool. Each of these tools requires that a pool theme be visible and active (but not in edit mode) to be active.
- Open the 'symbol window' from the 'Window' menu (or use Ctrl+P)
- Click on the 'ABC' icon to see what the current default text size will be. Change the text size to be appropriate for the scale you are viewing the map at. Generally it seems best to make the text about ½ a section tall.
- Click on the 'make labels'
 tool and then click anywhere on a pool to automatically label it with the pool name and formation abbreviation.
 - Pan around the map using the pan tool and the 'make labels' tool until all the pools are labeled. If you change scales (by zooming in or out) the relative label sizes will change which probably won't look good on the finished map.
- Then use the 'pointer' tool to position the labels manually. If you double click on a label (or choose 'Graphics > properties' from the menu), you will bring up a text editor for the label and text justification buttons.
- Use the 'make label leaders'
 tool when necessary to make labeling clearer.
- The 'draw pool boundaries'
 tool allows you to draw boundaries between pools. Try to make the boundaries as clear and as neat as possible.